I've moved all my blogs to my Wordpress blog. I will no longer be using Blogger from now onwards.
Visit my Wordpress blog at http://rishabhsrao.wordpress.com
All my old blogs here have been migrated to Wordpress.
I will leave this blog for "backward compatibility"!
Tuesday, August 17, 2010
Monday, August 16, 2010
Similar Artist Finder

Just created a new web-mashup application called Similar Artist Finder!
What the application does is really simple! Here it is in layman's terms:
App: Hi! Who is your favorite artist?
You: Oh, it's Taylor Swift; I absolutely love her!
App: Great! Hey, you know what, you may also like Gloriana, Carrie Underwood,
Kellie Pickler, Colbie Caillat and Lady Antebellum! Enjoy!
You: Wow, I didn't know about those artists! I'll start listening to their
songs too! That way, I can expand my taste in music! Thank you so much!
That's an awesome app!
Me: You're welcome and thank you too!
Hope you guys like it!
Tuesday, June 8, 2010
Links to My Event-Blogs
Here are the links to the blog posts of the events and seminars that I conducted as an OSUM Leader:
 We conducted this online quiz to help the students to prepare for their placements! About 50 students took the online test! The test consisted of questions in English, Verbal Reasoning, Non-verbal Reasoning and Math. Our server was running on an openSUSE 11.2! It was a nice experience!… Continue
Placement IGI
Added by Rishabh Rao on April 3, 2010 at 11:00am — No Comments
 Open Source University Meetup (OSUM) | GYAN - The Collective Learning | open-source quiz Blog date: 26th October 2009 Supported by Sun Microsystems, Inc. and Department of Information Science & Engineering (ISE) and JSS Academy of Technical Education, Bangalore (JSSATE) Wha… Continue
open-source quiz
Added by Rishabh Rao on October 26, 2009 at 7:30am — No Comments
placement++;
What? placement++;
Why? A programming challenge to gear up the students for campus recruitment!
Who?
Rishabh Rao (ISE)
Gautam M (EC)
Pavana P (IT)
Narendra G S (ISE)
Apoorva (CSE)
Where? 1st floor seminar hall, JSSATE
When? Wednesday, 10th March, 2010
Why? A programming challenge to gear up the students for campus recruitment!
Who?
Rishabh Rao (ISE)
Gautam M (EC)
Pavana P (IT)
Narendra G S (ISE)
Apoorva (CSE)
Where? 1st floor seminar hall, JSSATE
When? Wednesday, 10th March, 2010
Hi everyone!
Thank you so much, from the bottom of my heart, for making today's placement++; eve … Continue
Thank you so much, from the bottom of my heart, for making today's placement++; eve … Continue
Intro to OSUM @ FISE, JSSATE
22nd February 2010 was a memorable day! The much-awaited Forum of Information Science & Engineering (FISE) was formally inaugurated. I'll blog about this on Blogspot shortly. Immediately after the inauguration function, I delivered a presentation, "Introduction to OSUM" to all the students present there! … Continue
Jumble: JavaFX Style
I started learning JavaFX from scratch in the last week and it's been an amazing experience! I first looked at the examples at http://javafx.com/samples/; the applications are awesome! Although I've worked with Flash and Flex in the past, I always wished for an open-source alternative! JavaFX answered my call! After going through the tutorials at http://javafx.com/docs/gettingstarted/javafx/ (a… Continue
XML: eXtreMely powerfuL @ JSSATE
What? XML: eXtreMely powerfuL (talk)
Where? JSS Academy of Technical Education, Bangalore
Who? Rishabh Rao, OSUM Leader
When? 16th November 2009
It was a pleasant 9 o'clock in the morning and the students were all fresh and ready to learn about XML. So, we all gathered in the Computer Lab IV on the second floor. I started the seminar with what XML is all about and why is it so popular. I moved on to the origins of XML, how it helps in the business world. I then a ga… Continue
Friday, April 2, 2010
PuTTY for Symbian
My experiences with PuTTY on my Nokia E63 and my openSUSE 11.2 desktop computer!
Today I discovered a new amazing thing! I was able to connect to my desktop computer, over WiFi, from my mobile!
Here's how I did it! This also acts like a tutorial to anyone, who is new to the world of SSH!
Things you'll need
After installing PuTTY, you should see the PuTTY icon in your Installations folder.
Now, come back to your computer. We now need to verify whether the SSH daemon is up and running.
WARNING: What you are about to do is open the SSH port (22) on your computer. Anybody can connect to your computer using SSH, if this port is not protected by your firewall.
I highly recommend that you remove your telephone line from your modem now, so that you are safely disconnected from the Internet.
If you do this, you should be safe (except for local hackers who are within your modem's WiFi range!)
Just one last thing, you'll need to know your desktop computer's IP address. So open Terminal, it should be under green lizard icon >> Favorites section.
In here, type the following command:
/sbin/ifconfig
Here's what I see...
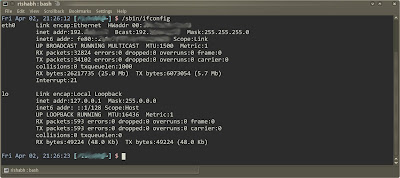
Under eth0, on the second line, there's this inet addr:, isn't it? Note the IP address written next to it. That's your computer's IP address. You'll need to enter this address in PuTTY.
Let's get back to PuTTY on your Symbian mobile phone
Here are the step-by-step instructions to connect to your openSUSE computer from your mobile phone:
I haven't figured out a way to transfer files between my computer and my mobile phone yet. There's a Java application called MobyExplorer and it has FTP support. Once I find out more about it, I'll blog it here!
Thank you for reading my blog and happy SSH-ing!
Post a comment if you have any doubts. I'll be happy to help you out!
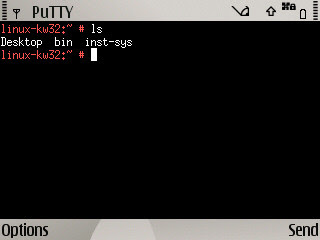
Here are some more screen-shots of me using PuTTY!
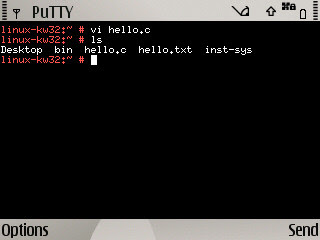
Here's a the popular ls command in action!
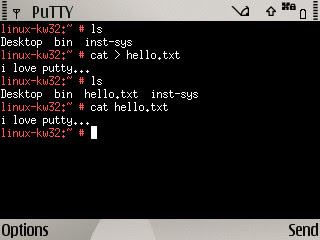
Here's where I create a file called hello.txt using the cat command and the shell's here document, <, operator. I later display the contents of hello.txt using cat.
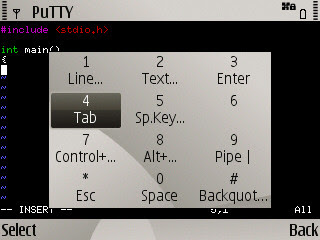
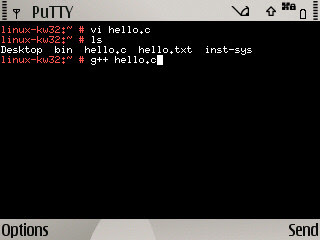
And this is the best part! You can actually use the vi editor and do programming!
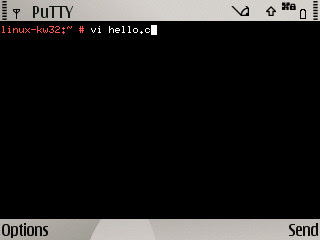
I'm typing the program using my QWERTY keypad! Notice that I use the Send option to send special characters, in this case, the Tab character.
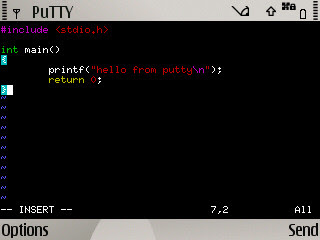
I'm done typing my hello-world C program!
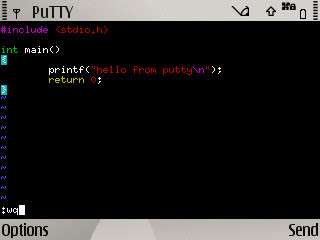
Time to save and quit!
As you can see, my C program, hello.c has been created!
Let me just compile that program using g++.
There you have it, g++ has conveniently create the executable file, a.out for me!

Let's execute it, shall we?
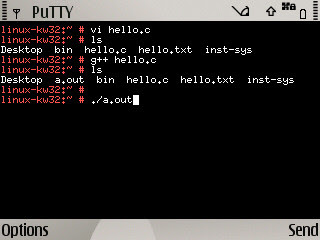
And here's the output of our program!
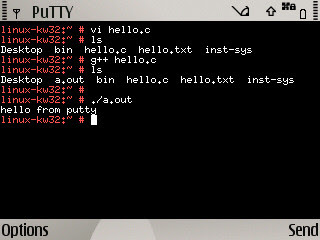
That's the combined power of Linux, SSH and Symbian, baby! Symbian rocks!
That's all from me this time! Stay tuned for more!
Today I discovered a new amazing thing! I was able to connect to my desktop computer, over WiFi, from my mobile!
Here's how I did it! This also acts like a tutorial to anyone, who is new to the world of SSH!
Things you'll need
- A desktop computer (if you're running a Linux distro, then better!) (and if you're running openSUSE 11.2:KDE even better!) (that's what I have!)
- A Nokia (Symbian series 60) mobile phone (a list of compatible phones is here)
- A wireless modem
- Some basic knowledge on how to use Linux's KDE environment, nothing much!
Okay, so let's get started
You'll need to first install openSUSE 11.2 on your computer! There's an amazing newbie guide to openSUSE 11.2 at http://opensuse-guide.org/. Go and read it; you'll learn everything about openSUSE (including how to install and stuff!)
Be sure you keep your wireless modem turned on and connected to your computer. So that openSUSE can automatically configure everything for you!
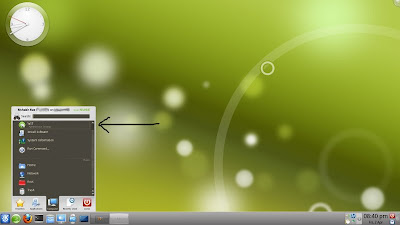
So, now that you've successfully installed openSUSE, sit back, relax and enjoy the beautiful KDE 4.3 desktop! Here's my desktop:

I know, I know, you just can't get your eyes off your breathtaking KDE 4.3 desktop, but you'll have to now look at your mobile phone, because we're now gonna install PuTTY on your Symbian phone!
Simply visit http://s2putty.sourceforge.net/ and go to the Download section. Here, download the appropriate installation file for your phone. You now need to transfer the .SIS installation file to your phone:
- Connect your phone in Mass Storage mode

- Hey, wait a minute, do you seriously need step-by-step instructions for transferring files?? I mean, come on, you can do this bit on your own!

After installing PuTTY, you should see the PuTTY icon in your Installations folder.
Now, come back to your computer. We now need to verify whether the SSH daemon is up and running.
- Click the green SUSE lizard logo on your Plasma panel.
- Roll your mouse over Computer.
- Click on YaST (Administrator Settings.)
- If prompted for the root password, enter it and say OK.
- The YaST control panel shows up.
- Now, click on System in the left-side panel, and then click on System Services (Runlevel) under System on the right-side.

- In the System Services window, scroll down until you see sshd. That's the SSH daemon. Select it and click on the Enable button below and you should get a pop-up window saying the the return value was 0 (success.) That's all. Now dismiss that pop-up window and say OK to the System Services window.


WARNING: What you are about to do is open the SSH port (22) on your computer. Anybody can connect to your computer using SSH, if this port is not protected by your firewall.
I highly recommend that you remove your telephone line from your modem now, so that you are safely disconnected from the Internet.
If you do this, you should be safe (except for local hackers who are within your modem's WiFi range!)
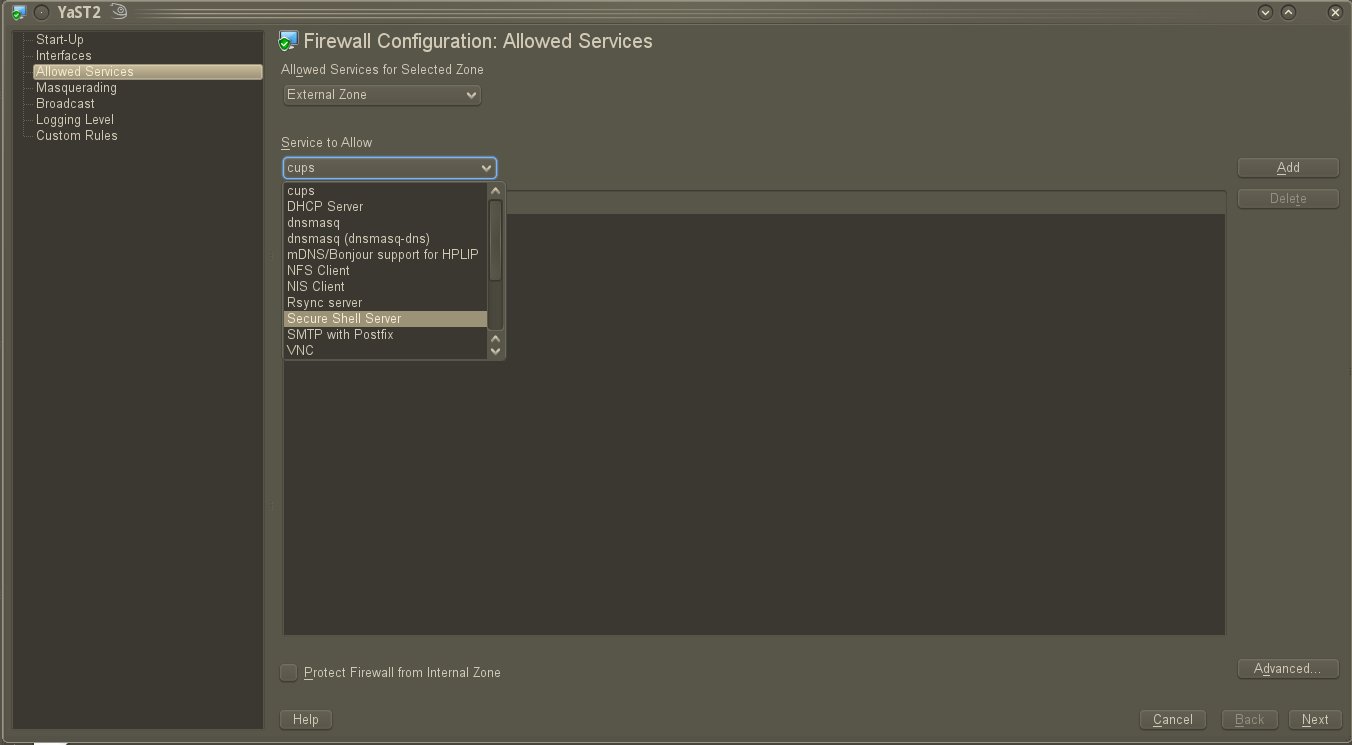
- On the left-side panel, click on Security and Users, and then on the right-side, click on Firewall, under the Security and Users section.

- Under the Firewall Configuration window, in the left-side panel, click on Allowed Services.
- Under the Service to Allow drop-down combo box, select Secure Shell Server.
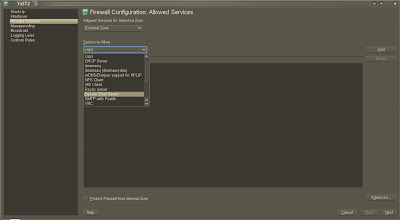
- Now click on the Add button at the right-side. Notice that Secure Shell Server gets added to the list below.
- Click on Next button at the bottom-right-side of the window.
- You will now see a summary of the settings that are going to change. Click Finish and your openSUSE will perform the firewall setting changes.

Just one last thing, you'll need to know your desktop computer's IP address. So open Terminal, it should be under green lizard icon >> Favorites section.
In here, type the following command:
/sbin/ifconfig
Here's what I see...

Under eth0, on the second line, there's this inet addr:, isn't it? Note the IP address written next to it. That's your computer's IP address. You'll need to enter this address in PuTTY.
Let's get back to PuTTY on your Symbian mobile phone
Here are the step-by-step instructions to connect to your openSUSE computer from your mobile phone:
- Start PuTTY from the Installations folder.

- Select Default.
- PuTTY will now ask you to enter the hostname of the computer you wanna connect to.

- Remember the IP address that you had noted down earlier? Type in the same here.
- Now, it's gonna ask you about which Access Point to use. Be sure your modem access point is defined in your phone. If not, the select Search for WLAN, select your modem's wireless network name (SSN) and optionally, enter the WEP/WPA2 key. By doing this, you'll be defining a new Access Point.

- Now PuTTY will attempt to connect to your computer.

- Once it's connected, it'll prompt you the enter the Login Name. Enter your openSUSE login name (user name) here.
 I use root so that I get full access rights. This is not a recommended approach.
 - It'll now prompt you to enter the password. So, enter the password for that user.

- Congratulations, you've successfully connected to your openSUSE computer via SSH!


I haven't figured out a way to transfer files between my computer and my mobile phone yet. There's a Java application called MobyExplorer and it has FTP support. Once I find out more about it, I'll blog it here!
Thank you for reading my blog and happy SSH-ing!
Post a comment if you have any doubts. I'll be happy to help you out!
Here are some more screen-shots of me using PuTTY!
Here's a the popular ls command in action!

Here's where I create a file called hello.txt using the cat command and the shell's here document, <, operator. I later display the contents of hello.txt using cat.

And this is the best part! You can actually use the vi editor and do programming!

I'm typing the program using my QWERTY keypad! Notice that I use the Send option to send special characters, in this case, the Tab character.

I'm done typing my hello-world C program!

Time to save and quit!

As you can see, my C program, hello.c has been created!

Let me just compile that program using g++.

There you have it, g++ has conveniently create the executable file, a.out for me!

Let's execute it, shall we?

And here's the output of our program!

That's the combined power of Linux, SSH and Symbian, baby! Symbian rocks!
That's all from me this time! Stay tuned for more!
Sunday, January 10, 2010
JavaFX: A Tutorial for Newbies!
After learning JavaFX for a few days, I decided to create my first JavaFX application! It's called Open-Source Jumble and I'm happy to say that it's up to the coveted version 1.0.0 now! Here is a screen shot of my application:
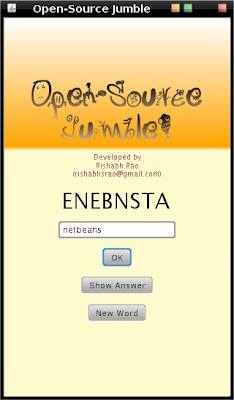
For all you curious readers out there, the font used for the title is Letras Locas available at KDE-Look.org and for all you curious folks reading this, I'm running openSUSE 11.2 (KDE) with the Aurorae theme engine! The window decoration theme is Kant2.
Read more about this application in my other blog at http://osum.sun.com/profiles/blogs/jumble-javafx-style!
So, now in the spirit of open-source, I'm going to teach you the basics of JavaFX in a simple, easy to follow, step-by-step tutorial. We'll start with a simple "Hello World" application and then gradually move on to more advanced stuff.
So, here we go! I'll write this blog as a conversation between you and me!
You: Wow, your application looks good! Can I too develop such applications? But I don't know anything about JavaFX! :(
Me: Thank you! Yes, sure you can! Don't worry, you're in the right place! :)
You: Okay, so what is JavaFX?
Me: JavaFX is a new Rich Internet Application (RIA) development platform, created by Sun Microsystems, where you can create visually attractive applications easily.
You: Oh, I see. Where is the JavaFX website located?
Me: Please see http://javafx.com/ and http://javafx.com/docs/gettingstarted/javafx/ will answer you previous question more precisely.
You: What all can I do with JavaFX?
Me: JavaFX is a very powerful platform. Check out http://javafx.com/samples/ to see some amazing applications developed in JavaFX!
You: Cool! Those sample applications are awesome! I too wanna learn JavaFX!
Me: Yes, they're are indeed awesome! They were developed using JavaFX. So, shall we start then?
You: You bet! What do I do first?
Me: The easiest way to start off JavaFX is to use an IDE (Integrated Development Environment) like NetBeans! Get NetBeans version 6.8 or later: JavaFX at the NetBeans IDE Download page. Click on the Download button under the JavaFX column. It's 78MB, so use a download manager. If you have a slow internet connection, consider requesting a CD/DVD from your institution's Sun OSUM club. Or ask one of your friends, who has broadband internet, to download it for you.
After downloading, read NetBeans 6.8 IDE Installation Instructions and install it on your computer. Before you install, please note that you need to have the latest Java SE Development Kit (JDK) installed on your system. Visit http://java.sun.com/javase/downloads for more information. Also, be sure to enable the Features On Demand feature while installing. It'll make the IDE start up faster.
You: Hey I installed NetBeans! How do I start creating applications?
Me: Start the NetBeans IDE. After it finishes loading the required modules, you'll see the NetBeans Start Page. Explore the Start Page, if you like to learn more about NetBeans.
Follow the steps below:
1. Click File >> New Project...
2. Under the Choose Project >> Categories
3. Now, under the Projects pane, click on JavaFX Script Application and click Next >
You'll see a window like this:
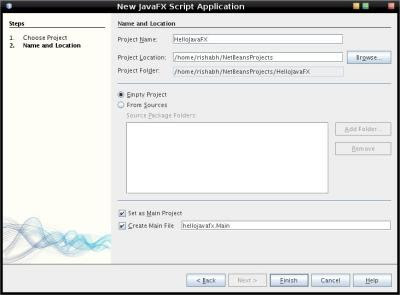
4. Give the Project Name as "HelloJavaFX" (or any other name you like!)
5. Be sure the Set as Main Project and Create Main File: [hellojavafx.Main] check-boxes are checked
6. Click Finish
and you're done!
You: Alright! I did that!
Me: Good! As you can see, NetBeans has set up everything for you. It has even created a small JavaFX application template. You have a minimal, but complete JavaFX application in front of you. If you'd like to run it and see now, simply click the Run button (it looks like a green play button found on media players!) above.
NetBeans will build the application and you'll see a new window titled Application title on your screen. There's also Application content written inside!
All JavaFX files end with a .fx extension, like your Main.fx file.
You can change the window title by changing the title of your Stage object literal. You can also modify the text inside the window by modifying the content of the Scene object literal.
There you have it, your first, simple "Hello World" JavaFX application!
I'll write more tutorials about JavaFX in the coming future! So, Follow me for more!
Subscribe to:
Posts (Atom)